About Slow Scan Television (SSTV) - First Generation
Some people think that SSTV is a method to send movie from its name, but it is a method to send still images instead of videos mainly using shortwave radio waves.
Probably the beginning of the technique for sending still images via radio waves or telephone lines is photograph facsimile. The image contains a lot of information,
and when trying to send this information by radio waves it is necessary to use either wide frequency band or spending long time. A photograph facsimile scans an image
over time and sends each resulting pixel over time in order. It is impossible to use a wide frequency band in the short wave band. Pixel data sent one after another was
converted into the intensity of light, synchronized with the scanning speed of the transmission source, and exposed directly on the printing paper.
 In the 1970s, in the amateur radio field, the SSTV system was established in which the horizontal and vertical scanning frequencies of black and white images were slowed
down to 15 Hz and 8 seconds, respectively, and the number of scan lines was reduced to 120. Another issue was how to image the incoming signal. A system for printing on
photographs was also created, as in photograph facsimile, but the mainstream method was to use a long afterglow cathode ray tube (CRT). At that time, they used a CRT
that was used for radar for at least 10 seconds to see an afterimage, and they watched intensively while raster line scanned the entire image from uppermost part to the
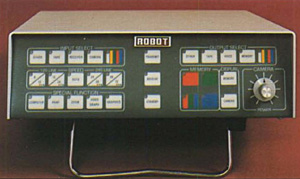
bottom in the dim room. Robot Research Inc. of the United States commercialized the Model 70 SSTV monitor and Model 80 SSTV camera in the mid-1970s, but I remember it
was very expensive. I was very interested because it was an interesting technique, but I couldn't really do anything by just reading the usage reports in magazines.
Amateur radio operators thought that taking a long time like a photograph facsimile is not interesting for amateurs. The technology that was devised there was to reduce
the image quality as much as possible and convert one image into an audio signal and send it in a relatively short time. This system is amateur radio SSTV, and the VE1BEL group
in Canada succeeded in sending images on the shortwave band in 1958. This technology was used in the 1960s as a system to send images from the Soviet Union's Vostok, Mercury
and Apollo spacecraft of NASA to the ground.
In the 1970s, in the amateur radio field, the SSTV system was established in which the horizontal and vertical scanning frequencies of black and white images were slowed
down to 15 Hz and 8 seconds, respectively, and the number of scan lines was reduced to 120. Another issue was how to image the incoming signal. A system for printing on
photographs was also created, as in photograph facsimile, but the mainstream method was to use a long afterglow cathode ray tube (CRT). At that time, they used a CRT
that was used for radar for at least 10 seconds to see an afterimage, and they watched intensively while raster line scanned the entire image from uppermost part to the
bottom in the dim room. Robot Research Inc. of the United States commercialized the Model 70 SSTV monitor and Model 80 SSTV camera in the mid-1970s, but I remember it
was very expensive. I was very interested because it was an interesting technique, but I couldn't really do anything by just reading the usage reports in magazines.
Amateur radio operators thought that taking a long time like a photograph facsimile is not interesting for amateurs. The technology that was devised there was to reduce
the image quality as much as possible and convert one image into an audio signal and send it in a relatively short time. This system is amateur radio SSTV, and the VE1BEL group
in Canada succeeded in sending images on the shortwave band in 1958. This technology was used in the 1960s as a system to send images from the Soviet Union's Vostok, Mercury
and Apollo spacecraft of NASA to the ground.
Second Genertion - Scan Converter
 Semiconductor technology developed rapidly in the 1980s. Robot Research Inc. launched a color scan converter in 1988 that digitizes the transmitted image data, stores it in memory,
and displays it as a single image on a personal computer. Based on the 8031 processor, the scan converter was controlled by 16 kB ROM. It is unbelievable from the current technology,
but the capacity of one memory device at that time was only 128 kB. This system was excellent at sending and receiving 2 kB image data over 12 seconds, storing it in memory and
displaying it on a color CRT of the computer. It was very expensive. However, it was epoch-making that full-color images could be sent and received via voice level communication.
Semiconductor technology developed rapidly in the 1980s. Robot Research Inc. launched a color scan converter in 1988 that digitizes the transmitted image data, stores it in memory,
and displays it as a single image on a personal computer. Based on the 8031 processor, the scan converter was controlled by 16 kB ROM. It is unbelievable from the current technology,
but the capacity of one memory device at that time was only 128 kB. This system was excellent at sending and receiving 2 kB image data over 12 seconds, storing it in memory and
displaying it on a color CRT of the computer. It was very expensive. However, it was epoch-making that full-color images could be sent and received via voice level communication.
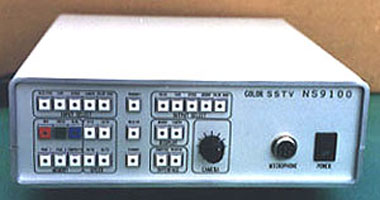
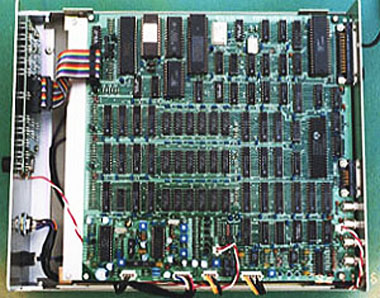
Since entering the 1990s, the price of semiconductor memory devices and LSIs has fallen and it has become fairly easy to obtain them, so domestic amateur radio volunteers developed a
domestic scan converter. I bought it in a kit and assembled it. It was in 1993.
|
|
| Japanese scan converter NS-9100 | Inside of NS-9100 |
 At that time, NEC's PC98 series was the most popular personal computer in Japan, and in 1991, Microsoft's Windows 3.1, a GUI that finally reached a practical level, was released.
Of course, it is impossible to connect external devices as easily as today's PCs. I had to buy an interface card and put it in a slot to connect the scan converter. To control the
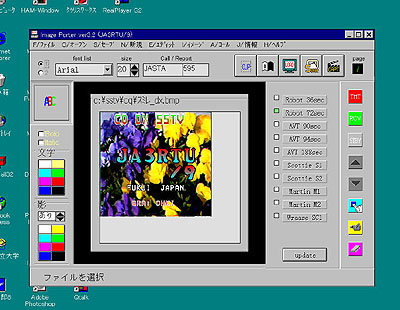
scan converter, I used software called "Image Porter" programmed by the Japanese amateur radio operator for the PC98 series.
At that time, NEC's PC98 series was the most popular personal computer in Japan, and in 1991, Microsoft's Windows 3.1, a GUI that finally reached a practical level, was released.
Of course, it is impossible to connect external devices as easily as today's PCs. I had to buy an interface card and put it in a slot to connect the scan converter. To control the
scan converter, I used software called "Image Porter" programmed by the Japanese amateur radio operator for the PC98 series.
Although it wasn't very easy to use from now on, I used this system lineup to communicate with quite a lot of stations, coupled with the favorable radio wave propagation conditions
of the time. Below, let's show you the images actually sent by communicating with overseas stations.
|
|
|
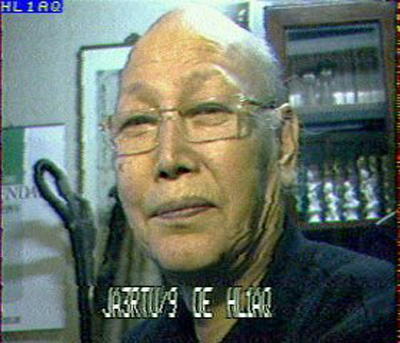
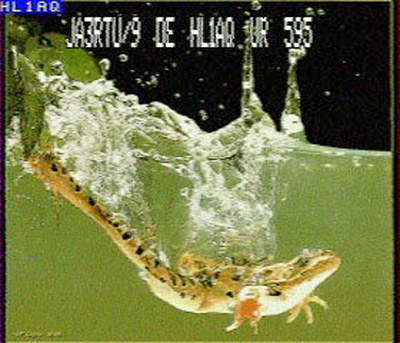
HL1AQ Sung (Seoul, Korea) Communication on 2 May 1993 |
|
|
|
|
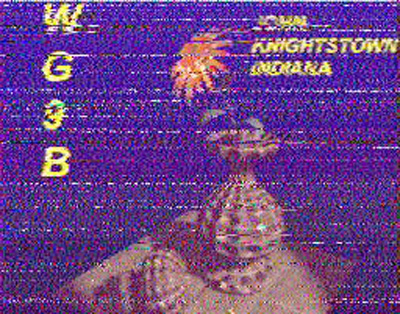
WG9B John (Indianapolis, USA) Communication on 25 April 1993 |
|
|
|
|
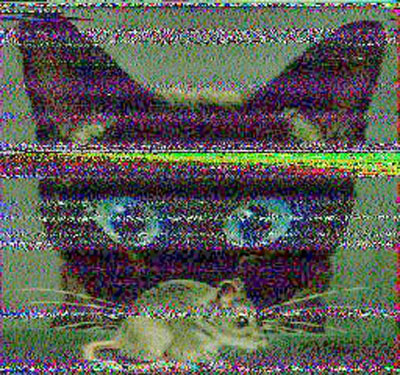
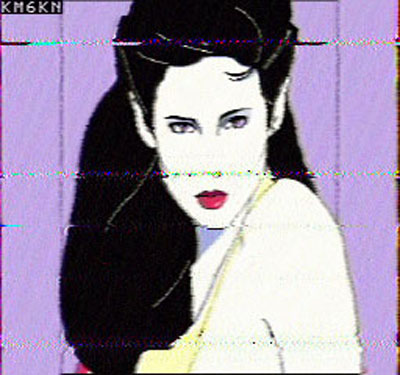
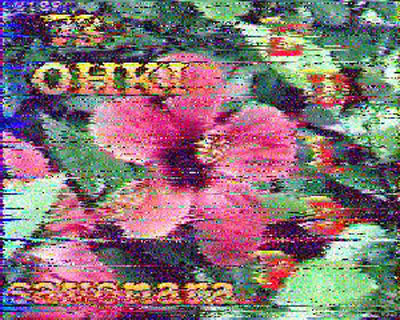
KM6KN Ray (San Diego, California, USA) Communication on 29 April 1993 |
|
|
|
|
|
|
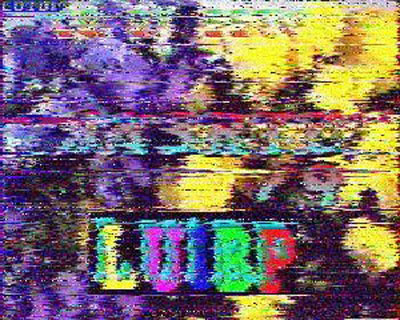
LU1BP Luciano (Buenos Aires, Argentina) Communication on 26 May 1993 |
|
|
|
|
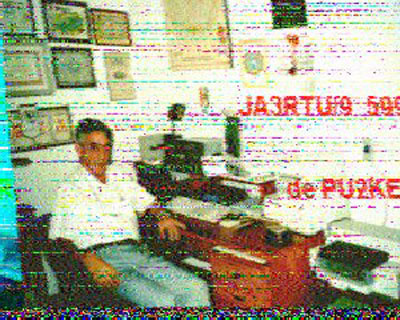
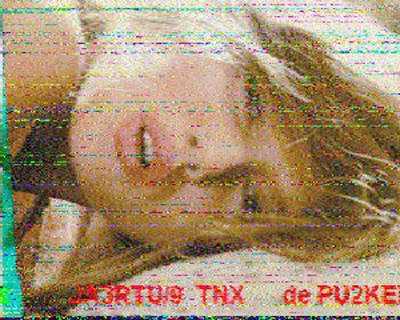
PU2KE Gyoergy (Brazil) Communication on 14 March 1999 |
|
|
|
|
|
|
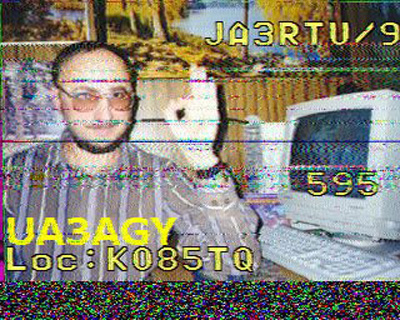
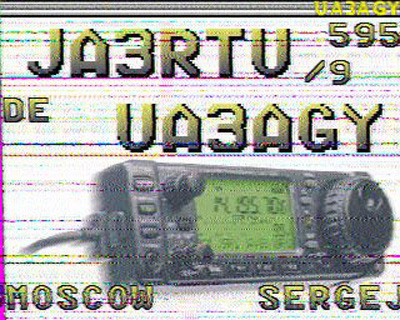
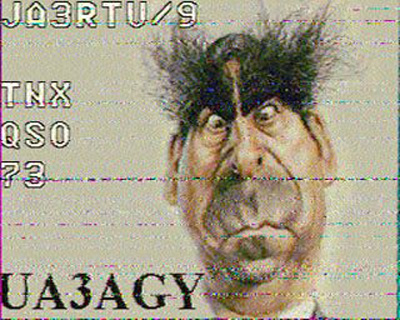
UA3AGY Serge (Moscow Москва́, Russia Российская Федерация) Communication on 22 May 1999 |
|
|
|
|
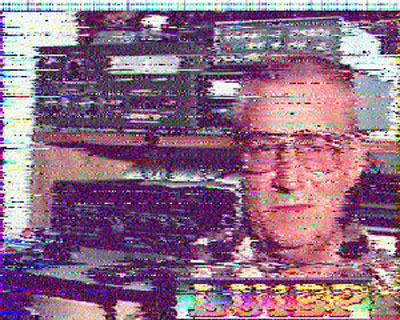
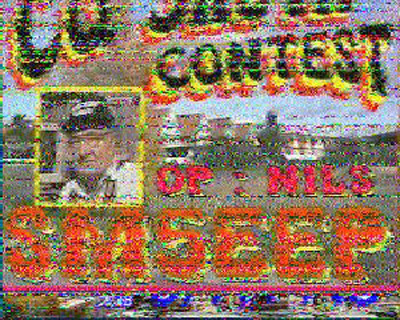
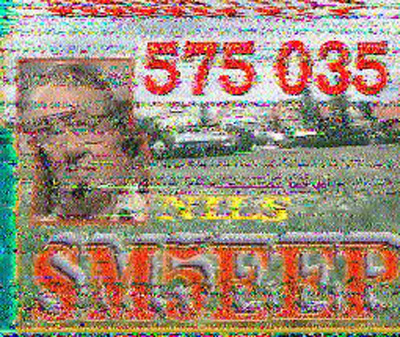
SM5EEP (Fagersta, Sweden) Communication on 14 March 1999 |
|
|
|
|
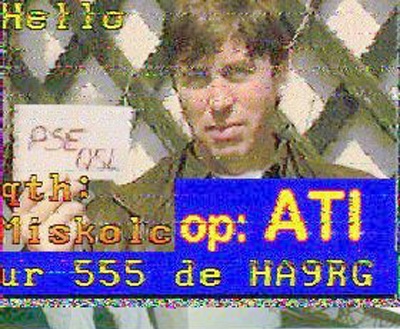
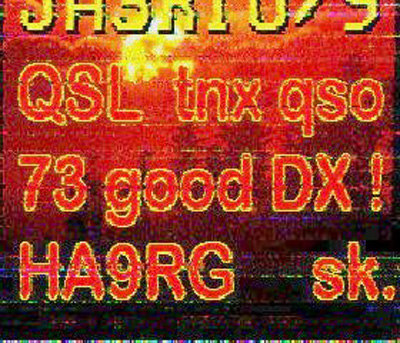
HA9RG Ati (Liskoic, Hungary Magyarország) Communication on 1 May 1999 |
|
|
|
|
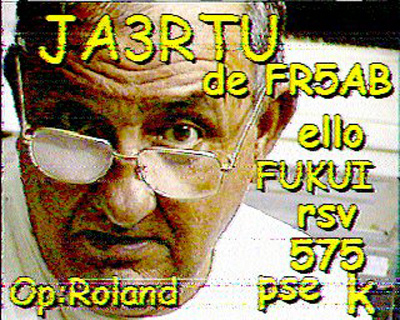
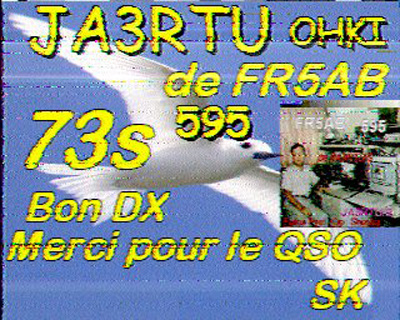
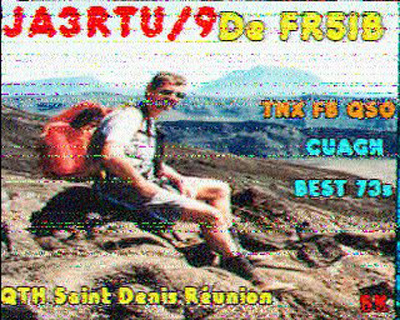
FR5AB Roland (Île de Réunion, Département d'outre-mer français) Communication of 28 May 1999 |
|
|
|
|
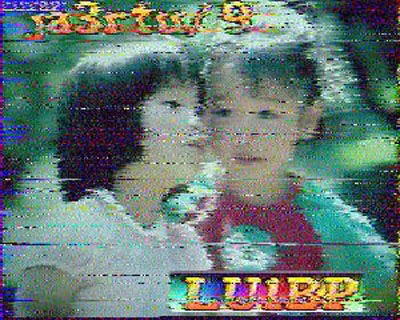
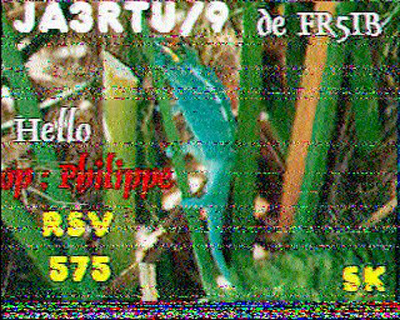
FR5IB Philippe (Île de Réunion, Département d'outre-mer français) Communication on 28 May 1999 |
|
 To the top of this page
Third Generation - Use of sound card of PC
 As the functions of PC have improved, the method that uses the sound card of the personal computer, captures the received voice to the PC, and decodes it directly by software
is the mainstream. Freeware or shareware was created around the world, but around 2005 in Japan JE3HHT Makoto Mori OM released a freeware called MMSSTV. Since the pioneers
created the early SSTV coding system, several new coding systems have been developed. This software supports all these new systems. It also has a function for
creating a transmission image.
As the functions of PC have improved, the method that uses the sound card of the personal computer, captures the received voice to the PC, and decodes it directly by software
is the mainstream. Freeware or shareware was created around the world, but around 2005 in Japan JE3HHT Makoto Mori OM released a freeware called MMSSTV. Since the pioneers
created the early SSTV coding system, several new coding systems have been developed. This software supports all these new systems. It also has a function for
creating a transmission image.
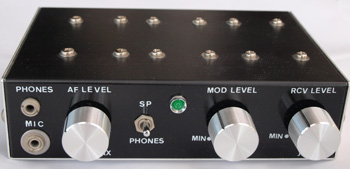
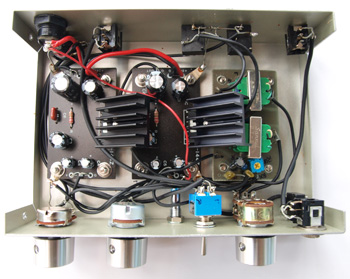
This system requires an audio signal interface between transceiver and PC as well transmission/reception switching (PTT) of the transceiver. I made this by myself. For PTT,
I made the interface using the signal from the RS232C of the PC. For an audio signal, I incorporated a 1:1 transformer to separate at DC level.
A stereo amplifier for PC was also built in.
|
|
| Homebrewed analogue interface and its inner view | |
In 2019, I purchased a new transceiver, YAESU's FTDX-3000. The new transceiver already has a USB interface, and what I had to do was only installing the USB driver
on the PC. To control the transceiver, connection between the transceiver and the PC is only with a single USB cable.
Now that the internet has developed, it has become easier to exchange gigabyte-sized files. So many of you may be wondering why we are sending and receiving small
images over time. However, I'm not the only person who feels romance to exchange images with unknown amateur radio stations on the other side of the earth using the
radio waves emitted from my radio station.
